提交工单
咨询集成、功能及报价等问题
When the ZEGOCLOUD SDK's default video capture module cannot meet your application's requirement, the SDK allows you to customize the video capture process. By enabling custom video capture, you can manage the video capture on your own and send the captured video data to the SDK for the subsequent video encoding and stream publishing. With custom video capture enabled, you can still call the SDK's API to render the video for local preview, which means you don't have to implement the rendering yourself.
Listed below are some scenarios where enabling custom video capture is recommended:
Before enabling this feature, please make sure:
The process of custom video capture is as follows:
ZegoExpressEngine instance.onStart will be triggered.onStart, start sending video frame data to the SDK.onStop will be triggered. On receiving this callback, stop the video capture.Refer to the API call sequence diagram below to implement custom video capture in your project:
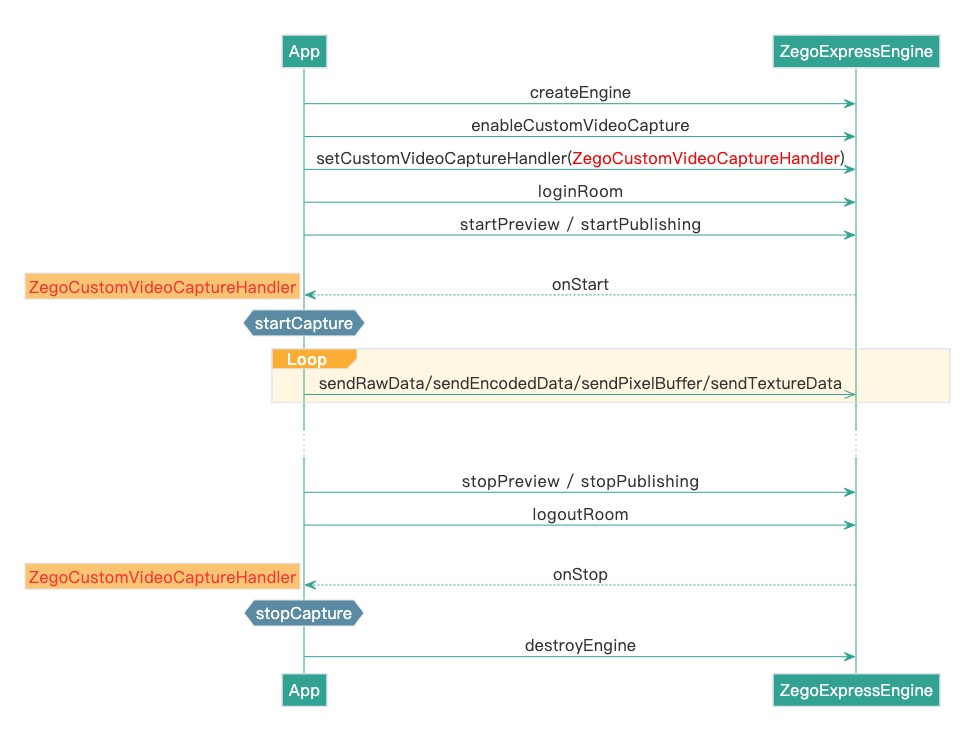)
To enable the custom video capture, you will need to set the enablecamera method to True (default settings); Otherwise, there will be no video data when you publishing streams.
First, create a ZegoCustomVideoCaptureConfig object and configure the bufferType attribute to specify the data type to be used to send the captured video frame data to the SDK. Then, call enableCustomVideoCapture to enable custom video capture.
Currently, the SDK supports two video buffer types for iOS: ZegoVideoBufferTypeCVPixelBuffer for the CVPixelBuffer data type, and ZegoVideoBufferTypeGLTexture2D for the GLTexture2D data type.
ZegoCustomVideoCaptureConfig *captureConfig = [[ZegoCustomVideoCaptureConfig alloc] init];
// Set the data type of the captured video frame to CVPixelBuffer.
captureConfig.bufferType = ZegoVideoBufferTypeCVPixelBuffer;

[[ZegoExpressEngine sharedEngine] enableCustomVideoCapture:YES config:captureConfig channel:ZegoPublishChannelMain];
Set ViewController as the callback object of the custom video capture callbacks, which conforms to the ZegoCustomVideoCaptureHandler protocol.
@interface ViewController () <ZegoEventHandler, ZegoCustomVideoCaptureHandler>

    ......

@end
Call setCustomVideoCaptureHandler to set up an event handler to listen for and handle the callbacks related to custom video capture.
// Set the engine itself as the callback handler object
[[ZegoExpressEngine sharedEngine] setCustomVideoCaptureHandler:self];
Implement the callback handler methods for the callbacks onStart and onStop.
When customizing the capturing of multiple streams, you will need to specify the stream-publishing channel throught the callback onStart, and onStop. Otherwise, only the main channel's event callbacks will be notified by default.
// Note: This callback is not called in the main thread. Please switch to the main thread if you need to operate the UI objects.
- (void)onStart {

    // On receiving the onStart callback, you can execute the tasks to start up your customized video capture process and start sending video frame data to the SDK.

    // Here is an example of turning on the video capture device.
    [self.captureDevice startCapture];
}

// Note: This callback is not called in the main thread. Please switch to the main thread if you need to operate the UI objects.
- (void)onStop {

    // On receiving the onStop callback, you can execute the tasks to stop your customized video capture process and stop sending video frame data to the SDK.

    // Here is an example of turning off the video capture device.
    [self.captureDevice stopCapture];
}When you call startPreview to start the local preview or call startPublishingStream to start the stream publishing, the callback onStart will be triggered. On receiving this callback, you can start the video capture process and then call sendCustomVideoCapturePixelBuffer or sendCustomVideoCaptureTextureData to send the captured video frame data to the SDK.
During the video capturing process, if you sent the encoded video frame data via the sendCustomVideoCaptureEncodedData method to the SDK, the SDK will not be able to preview. That is, at this point, you will need to set up the preview yourself.
See below an example of sending the captured video frame data in CVPixelBuffer format to the SDK.
#pragma mark - AVCaptureVideoDataOutputSampleBufferDelegate

- (void)captureOutput:(AVCaptureOutput *)captureOutput didOutputSampleBuffer:(CMSampleBufferRef)sampleBuffer fromConnection:(AVCaptureConnection *)connection {
    CVPixelBufferRef buffer = CMSampleBufferGetImageBuffer(sampleBuffer);
    CMTime timeStamp = CMSampleBufferGetPresentationTimeStamp(sampleBuffer);

    // Send the captured video frame in CVPixelBuffer data to ZEGO SDK
    [[ZegoExpressEngine sharedEngine] sendCustomVideoCapturePixelBuffer:buffer timeStamp:timeStamp];
}
When both the stream publishing and local preview are stopped, the callback onStop will be triggered. On receiving this callback, you can stop the video capture process, for example, turn off the camera.
To set the state of the custom capturing devices after receiving the onStart callback, call the setCustomVideoCaptureDeviceState method as needed.
For the stream player to obtain the state of the capturing device, listen for the onRemoteCameraStateUpdate callback.
If the stream publisher sets the device state to ZegoRemoteDeviceStateDisable or ZegoRemoteDeviceStateMute by calling the setCustomVideoCaptureDeviceState method, then the stream player can't receive event notification through the callback onRemoteCameraStateUpdate.
When the stream publisher turns off the camera with the enableCamera method, the stream player can recognize the device state ZegoRemoteDeviceStateDisable through the onRemoteCameraStateUpdate callback.
When the stream publisher stops publishing video streams with the mutePublishStreamVideo method, the stream player can recognize the device state ZegoRemoteDeviceStateMute through the onRemoteCameraStateUpdate callback.
ZegoVideoBufferTypeGLTexture2D data type to transfer the captured video data?Set the bufferType attribute of the ZegoCustomVideoCaptureConfig object to ZegoVideoBufferTypeGLTexture2D, and then call the sendCustomVideoCaptureTextureData method to send the captured video frame.
That is because the aspect ratio of the captured video is different from the aspect ratio of the SDK's default encoding resolution. For instance, if the aspect ratio of the captured video is 4:3, but the aspect ratio of the SDK's default encoding resolution is 16:9, you can solve the problem using either one of the following solutions:
setVideoConfig to set the SDK's video encoding resolution to a resolution aspect ratio 4:3.setCustomVideoCaptureFillMode to set the video fill mode to ZegoViewModeAspectFit (the video will have black padding areas) or "ZegoViewModeAspectFill" (part of the video image will be cropped out).Call setVideoConfig to set the frame rate to be the same as the video capture frame rate (i.e., the frequency of calling sendCustomVideoCapturePixelBuffer or sendCustomVideoCaptureTextureData)
When the SDK receives the video frame data, it will first copy the data synchronously and then perform encoding and other operations asynchronously. The captured video frame data can be released once they are passed into the SDK.
During the Custom video capturing, when the device direction changes, you can switch the screen between portrait and landscape orientation by the following two methods:
sendCustomVideoCapturePixelBuffer method.rotation property of the ZegoVideoEncodedFrameParam method based on the actual situation. And then call the sendCustomVideoCaptureEncodedData method with the video frame data and rotation parameters, and send the processed data to the SDK.