提交工单
咨询集成、功能及报价等问题
In real-time scenarios requiring high quality and great experience, conducting tests before implementing a call helps troubleshoot in advance and improve the overall user experience.
This document describes how to implement these tests by using ZEGOCLOUD's SDK APIs.
Before starting the speed measurement, you can set the callback related to the speed measurement.
When an error occurs during the speed test, the onNetworkSpeedTestError callback will be triggered. Under normal speed measurement conditions, onNetworkSpeedTestQualityUpdate callback will be triggered when network speed quality is updated.
-(void)onNetworkSpeedTestError:(int)errorCode type:(ZegoNetworkSpeedTestType)type {
     NSLog(@"onNetworkSpeedTestError errorCode=%d, type=%d", errorCode, type);
}

-(void)onNetworkSpeedTestQualityUpdate:(ZegoNetworkSpeedTestQuality *)quality type:(ZegoNetworkSpeedTestType)type {
     NSLog(@"onNetworkSpeedTestQualityUpdate rtt=%d packetLostRate=%f connectCost=%d type=%d", quality.rtt, quality.packetLostRate, quality.connectCost, type);
}Create an instance of ZegoNetworkSpeedTestConfig network speed test configuration, according to the actual situation, set whether to perform uplink and downlink speed test and expected bit rate , call startNetworkSpeedTest interface to start network speed test.
ZegoNetworkSpeedTestConfig *config = [[ZegoNetworkSpeedTestConfig alloc] init];
ZegoVideoConfig *videoConfig = [[ZegoExpressEngine sharedEngine] getVideoConfig];

// Perform uplink speed measurement and specify the desired push rate
config.testUplink = YES;
config.expectedUplinkBitrate = videoConfig.bitrate;

// Perform downlink speed measurement and specify the desired streaming code rate
config.testDownlink = YES;
config.expectedDownlinkBitrate = videoConfig.bitrate;

// start speed test
[[ZegoExpressEngine sharedEngine] startNetworkSpeedTest:config];Call stopNetworkSpeedTest interface to stop the network speed test.
After stopping the speed test, you will no longer receive onNetworkSpeedTestError or onNetworkSpeedTestQualityUpdate callback.
[[ZegoExpressEngine sharedEngine] stopNetworkSpeedTest];The following diagram shows the process of the microphone test:
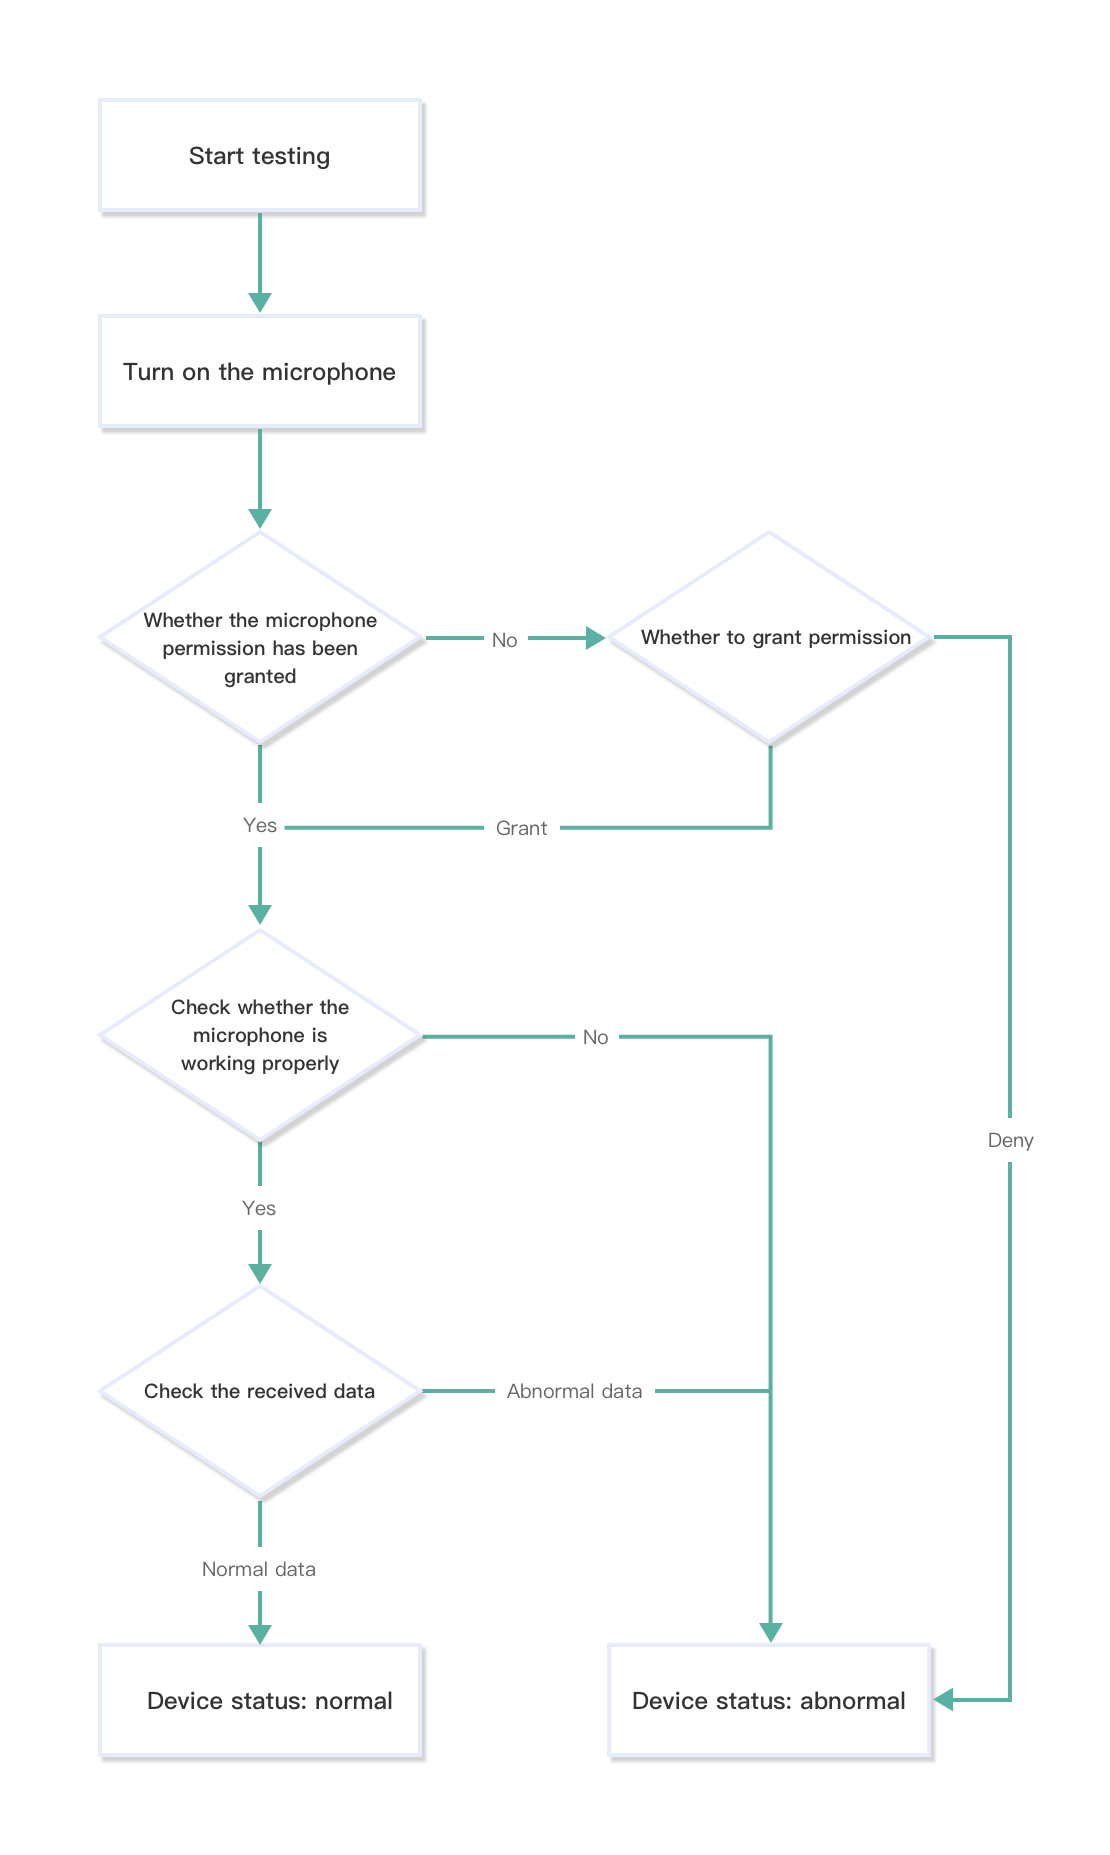)
1. Turn on the microphone
To enable the audio capturing when no streams are published, call the startPreview method to turn on the microphone.
[[ZegoExpressEngine sharedEngine] startPreview:nil];2. Check the permission
The ZEGO SDK automatically checks whether the microphone permission has been granted.
If this permission is not authorized, the system will apply for permission. If the permission grant is denied, you need to manually enable the permission in system settings.
3. Check whether the microphone working properly
To check whether the microphone is working properly, listen for the callback accordingly. If no errors occurred (you can implement Step 4 at the same time), and the microphone received data is detected normally, then the microphone is working properly.
onDeviceError./// Error notifications of the devices.
/// @param [errorCode] refers to the error code. For details, refer to the related document.
/// @param [deviceName] refers to the device type.
- (void)onDeviceError:(int)errorCode deviceName:(NSString *)deviceName;onLocalDeviceExceptionOccurred./// Error notifications of the local devices.
///
/// Version supported: 2.15.0 or later.
/// Description: Error occurred on the local device.
/// Timing: This callback will be triggered when the local audio or video device does not work properly.
///
/// @param [exceptionType] refers to the error type.
/// @param [deviceType] refers to the device type.
/// @param [deviceID] refers to the device ID. Currently, only desktop devices can be used to identify specific devices. For mobile devices, this parameter returns an empty string.
- (void)onLocalDeviceExceptionOccurred:(ZegoDeviceExceptionType)exceptionType deviceType:(ZegoDeviceType)deviceType deviceID:(NSString *)deviceID;4. Check the captured data
To check the captured data by the microphone, call the startSoundLevelMonitor method to get the sound energy value. If no exceptions are detected, the microphone is ready to be used.
[[ZegoExpressEngine sharedEngine] startSoundLevelMonitor];The following diagram shows the process of the camera test:
)
1. Turn on the camera
To enable the video capturing and local video preview when no streams are published, call the startPreview method to bind the view of the preview of the camera.
ZegoCanvas *previewCanvas = [ZegoCanvas canvasWithView:self.previewView];
[[ZegoExpressEngine sharedEngine] startPreview:previewCanvas];
2. Check the permission
The ZEGO SDK automatically checks whether the camera permission has been granted.
If this permission is not authorized, the system will apply for permission. If the permission grant is denied, you need to manually enable the permission in system settings.
3. Check whether the camera working properly
To check whether the camera is working properly, listen for the callback accordingly. If no errors occurred (you can implement Step 4 at the same time), and the captured images are displayed normally, then the camera is working properly.
onDeviceError./// Error notifications of the devices.
/// @param [errorCode] refers to the error code. For details, refer to the related document.
/// @param [deviceName] refers to the device type.
- (void)onDeviceError:(int)errorCode deviceName:(NSString *)deviceName;onLocalDeviceExceptionOccurred./// Error notifications of the local devices.
///
/// Version supported: 2.15.0 or later.
/// Description: Error occurred on local device.
/// Timing: This callback will be triggered when the local audio or video device does not work properly.
///
/// @param [exceptionType] refers to the error type.
/// @param [deviceType] refers to the device type.
/// @param [deviceID] refers to the device ID. Currently, only desktop devices can be used to identify specific devices. For mobile devices, this parameter returns an empty string.
- (void)onLocalDeviceExceptionOccurred:(ZegoDeviceExceptionType)exceptionType deviceType:(ZegoDeviceType)deviceType deviceID:(NSString *)deviceID;4. Check the captured images
If the image captured by the camera are displayed normally, then the camera is ready to be used.
The following diagram shows the process of the playback device test:
)
1. Play audio files using media player
To play the audio file you used for testing, call the ZegoMediaPlayer method.
/// 1. Create a mediaplayer object.
ZegoMediaPlayer *mediaPlayer = [[ZegoExpressEngine sharedEngine] createMediaPlayer];
/// 2. Load the media resource.
NSString *resourcePath = "xxx";
[mediaPlayer loadResource: resourcePath callback:^(int errorCode) {
    NSLog(@"Media Player load resource. errorCode: %d", errorCode);
}];
/// 3. Play the resource file.
[mediaPlayer start];
2. Check whether the audio can be heard
If you can hear the audio file you played, then the device is working properly and is ready to be used.
To listen for and receive the event callbacks related to the status of the media player, call the mediaPlayer:stateUpdate:errorCode: method.
/// The event callbacks related to the status of the media player.
/// @param [mediaPlayer] refers to the mediaplayer instance.
/// @param [state] refers to the status of the media player.
/// @param [errorCode] refers to the error codes. For details, refer to the related document.
- (void)mediaPlayer:(ZegoMediaPlayer *)mediaPlayer stateUpdate:(ZegoMediaPlayerState)state errorCode:(int)errorCode;If the value returned by the callback onDeviceError is not 0, refer to the Error codes for more details.
